Samsung GT-P1000 Galaxy Tab CyanogenMod install
From CPKB - Cell Phone Knowledge Base
Procedure of installing CyanogenMod 9.1.0 on Samsung GT-P1000 Galaxy Tab.
Contents
Also known as[edit]
- Samsung GT-P1000 Galaxy Tab tablet rooting / CyanogenMod 9.1 firmware install
- Samsung GTP1000 GalaxyTab mobile phone Cyanogen Mod 9.1.0 ROM flash
Notes[edit]
- Everything will be erased from the tablet. Always make a full backup before flashing / modding tablet!
- This method / firmware files are compatible only with Samsung GT-P1000 Galaxy Tab! Always check device type before starting this procedure!
- If you follow this procedure you will have those firmwares on the tablet:
- ClockworkMod Recovery v3.0.0.5
- Android version: 4.0.4
- Kernel version: 2.6.35.13-g8d814c4 blinky-ghost@cyanogenmod #1 Tue Aug 28 16:59:18 PDT 2012
- Cyanogenmod version: 9.1.0-p1
- Build date: Tue Aug 28 16:55:09 PDT 2012
- Build number: cm_p1-userdebug 4.0.4 IMM76L eng. .20120828.165452 test-keys
Requirements[edit]
- Samsung GT-P1000 Galaxy Tab:
- Should be charged (more than 75%)
- Should have the original, unrooted firmware
- Windows (XP / Vista / 7 ...) PC with Administrator rights
- USB cable for connecting the device to the computer
- firmware / ROM files, flashing software. Download links (all-in-one):
- Device drivers for Samsung Galaxy Tab: just install Samsung Kies
Procedure[edit]
1. Download neccessary files[edit]
- Device drivers: install Samsung Kies: http://www.samsung.com/us/kies/
- All-in-one package (ClockworkMod Recovery, CyanogenMod 9.1.0, Google Apps Package, Samsung Odin)
unrar the files only once from the compressed rar file, do not unrar the files in the different folders!
2. Flash ClockworkMod Recovery[edit]
Now we will root and install ClockworkMod Recovery on the tablet. (This lets you install custom ROMs like CyanogenMod on devices.)
- 2.1 Start the tablet in Download Mode.
- 2.2 Connect the tablet to the computer with USB cable, wait until all the drivers are installed.
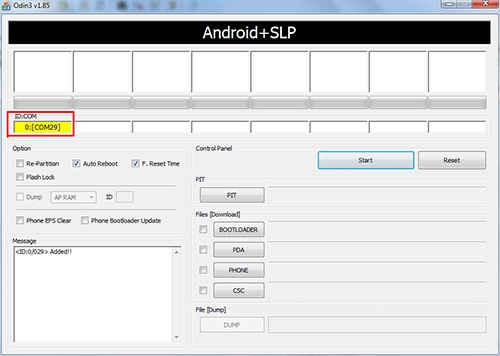
- 2.3 Run Samsung Odin3 v 1.85.exe, make sure it recognises the device: ID:COM field should show the port where the device is connected.
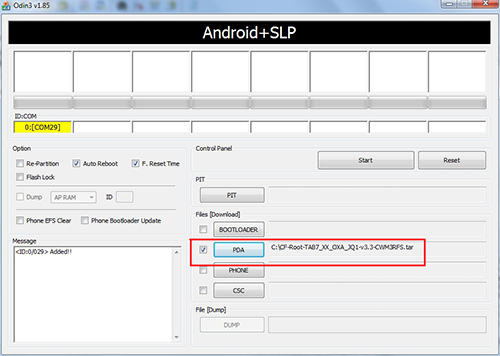
- 2.4 Click on PDA button, then select ClockworkMod Recovery\CF-Root-XX_OXA_JW4-v4.4-CWM3RFS.tar file. All the other checkboxes should be like on the picture.
- 2.5 Click on Start button to start the flashing process.
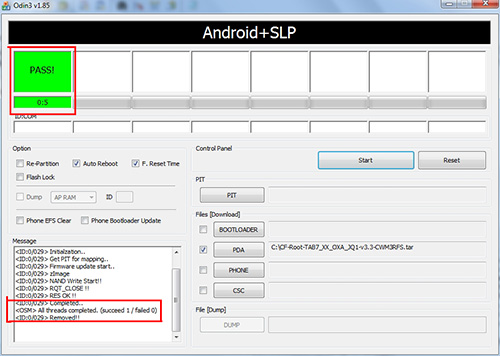
- 2.6 Samsung Odin3 will flash the files. Wait until PASS appears on the top left corner, and device restarts. If you get FAIL message, remove the tablet from cable and repeat the flashing procedure again.
- 2.7 You can remove the tablet from cable. Now your tablet is rooted and ClockworkMod is installed! Turn on the tablet.
3. Install CyanogenMod[edit]
CyanogenMod 9.1.0 will be installed using the custom ClockworkMod Recovery we just flashed on the device. Here is the process step-by-step:
- 3.1 Turn on device and connect it to the computer with USB cable as Mass Storage.
- 3.2 Copy cm-9.1.0-p1.zip file from CyanogenMod v9.1 for Galaxy Tab GT-P1000 folder to the tablet's drive's root.
- 3.3 Remove the tablet from computer, and turn it off.
- 3.4 Start the the tablet in Recovery Mode by pressing Volume up turning on the device.
- 3.5 ClockworkMod Recovery will start. In the menu you can use volume buttons to move up / down and the On/Off button to enter / select.
Now you can make a backup of your existing Android system by selecting backup and restore.
- 3.6 Select wipe data/factory reset to erase the tablet's contents
- 3.7 Choose Install zip from SD card, then choose zip from sdcard, then select cm-9.1.0-p1.zip file you just copied to the root of the tablet. Then confirm that you really want to flash this file.
- 3.8 The installation could take several minutes. When the flashing process finished, return to the main menu and select reboot system now.
- 3.9 Now the tablet will boot in CyanogenMod. The first boot can take several minutes (even 10-15!), be patient! After the first start, it is recommended to restart the device.
4. Install Google Apps (optional)[edit]
CyanogenMod does not comes with Google Applications (Google Play Store, Google Account) so it should be installed afterwards. The installation process is similar to the installation of the CyanogenMod.
- 4.1 Turn on the tablet and connect it to the computer with USB cable as Mass Storage.
- 4.2 Copy gapps-ics-20120429-signed.zip file from Google Apps folder to the tablet's drive's root.
- 4.3 Remove tablet from computer, and turn the tablet off.
- 4.4 Start the tablet in Recovery Mode by pressing Volume up and turning it on.
- 4.5 ClockworkMod Recovery will start. In the menu you can use volume buttons to move up / down and Home button to enter / select.
- 4.6 Choose Install zip from SD card, then choose zip from sdcard, then select gapps-ics-20120429-signed.zip file you just copied to the root of the tablet . Then confirm that you really want to flash this file.
- 4.7 When the flashing process finished, return to the main menu and select reboot system now.
- 4.8 After the Tab was turned on, check if the Play Store app is on the tablet. Now you can use that to download and install applications.
- 4.9 The flashing of the tablet completely done. Now you have a rooted Galaxy Tab with ClockworkMod recovery and CyanogenMod 9.1.0 ROM.
Possible errors[edit]
- Samsung Odin does not recognises the device
- In "Device manager" find the Galaxy Tab usb device, and update the driver to the newest. Computer may be restarted afterwards.
- Tablet does not boot in recovery mode
- Install ROM manager app on the tablet and use the built-it recovery mode reboot.
- Google Play Store does not start / freezes
- Start the device in recovery mode, and clear cache / clear dalvik cache.
Download links[edit]
Other download links to needed firmwares / ROMs / softwares:
- Samsung Kies
- CyanogenMod
- Google Apps Package for CyanogenMod
- Original Samsung GT-P1000 firmware files
See also[edit]
- http://www.cyanogenmod.org/
- http://theunlockr.com/2012/05/07/how-to-root-and-flash-the-clockworkmod-recovery-on-the-galaxy-tab-p1000-running-gingerbread/
- Samsung enter Download mode
- Samsung enter Recovery mode
- Samsung download mode usb jig
- Samsung GT-P1000 Galaxy Tab download mode
- Samsung GT-P1000 Galaxy Tab recovery mode


