|
|
| (2 intermediate revisions by 2 users not shown) |
| Line 21: |
Line 21: |
| | ** download firmware using [[Navifirm]] | | ** download firmware using [[Navifirm]] |
| | | | |
| − | <span onmouseover="_tipon(this)" onmouseout="_tipoff()"><span class="google-src-text" style="direction: ltr; text-align: left">== Language- and product code change procedure == 1.</span> == Язык и код продукта изменение процедуры == 1.</span> <span onmouseover="_tipon(this)" onmouseout="_tipoff()"><span class="google-src-text" style="direction: ltr; text-align: left">Turn on phone and connect it in OVI / PC Suite mode to computer with USB data cable.</span> Включите телефон и подключите его в OVI / PC режим для новобрачных к компьютеру с USB кабель данных.</span> <span onmouseover="_tipon(this)" onmouseout="_tipoff()"><span class="google-src-text" style="direction: ltr; text-align: left">Install all the necessary USB cable drivers.</span> Установите все необходимые кабеля USB драйверами.</span> <span onmouseover="_tipon(this)" onmouseout="_tipoff()"><span class="google-src-text" style="direction: ltr; text-align: left">2.</span> 2.</span> <span onmouseover="_tipon(this)" onmouseout="_tipoff()"><span class="google-src-text" style="direction: ltr; text-align: left">Run Phoenix Service Software as administrator.</span> Запустите Phoenix Service Software в качестве администратора.</span> <span onmouseover="_tipon(this)" onmouseout="_tipoff()"><span class="google-src-text" style="direction: ltr; text-align: left">(Windows Vista, 7: right click -> run as administrator; XP: login with administrator privileges) [[File:Flashing_with_Phoenix_01.jpg]] 3.</span> (Windows Vista, 7: щелкните правой кнопкой мыши -> Запуск от имени администратора, XP: вход в систему с правами администратора) [[File: Flashing_with_Phoenix_01.jpg]] 3.</span> <span onmouseover="_tipon(this)" onmouseout="_tipoff()"><span class="google-src-text" style="direction: ltr; text-align: left">Select the USB port where the phone is connected.</span> Выберите порт USB, где телефон подключен.</span> <span onmouseover="_tipon(this)" onmouseout="_tipoff()"><span class="google-src-text" style="direction: ltr; text-align: left">[[File:Flashing_with_Phoenix_02.jpg]] 4.</span> [[File: Flashing_with_Phoenix_02.jpg]] 4.</span> <span onmouseover="_tipon(this)" onmouseout="_tipoff()"><span class="google-src-text" style="direction: ltr; text-align: left">Select "Scan product" in "File" menu to read phone information.</span> Выберите "Scan продукт" в меню "Файл", чтобы прочитать информацию о телефоне.</span> <span onmouseover="_tipon(this)" onmouseout="_tipoff()"><span class="google-src-text" style="direction: ltr; text-align: left">[[File:Flashing_with_Phoenix_03.jpg]] 5.</span> [[File: Flashing_with_Phoenix_03.jpg]] 5.</span> <span onmouseover="_tipon(this)" onmouseout="_tipoff()"><span class="google-src-text" style="direction: ltr; text-align: left">Mobile phone information sould be appear on the statusbar.</span> Мобильный телефон информацию sould будет отображаться в строке состояния.</span> <span onmouseover="_tipon(this)" onmouseout="_tipoff()"><span class="google-src-text" style="direction: ltr; text-align: left">That means the connection is working between mobile phone and computer.</span> Это означает, что соединение работает между мобильным телефоном и компьютером.</span> <span onmouseover="_tipon(this)" onmouseout="_tipoff()"><span class="google-src-text" style="direction: ltr; text-align: left">[[File:Flashing_with_Phoenix_04.jpg]] 6.</span> [[File: Flashing_with_Phoenix_04.jpg]] 6.</span> <span onmouseover="_tipon(this)" onmouseout="_tipoff()"><span class="google-src-text" style="direction: ltr; text-align: left">Select "Firmware Update" from "Flashing" menu.</span> Выберите пункт "Firmware Update" от "мигающий" меню.</span> <span onmouseover="_tipon(this)" onmouseout="_tipoff()"><span class="google-src-text" style="direction: ltr; text-align: left">[[File:Flashing_with_Phoenix_05.jpg]] 7.</span> [[File: Flashing_with_Phoenix_05.jpg]] 7.</span> <span onmouseover="_tipon(this)" onmouseout="_tipoff()"><span class="google-src-text" style="direction: ltr; text-align: left">Phoenix Service Software will automatically select the suitable firmware (if available) for the connected mobile phone's product code.</span> Phoenix Service Software автоматически выберет подходящую прошивку (если таковые имеются) кода продукта для подключенного мобильного телефона.</span> <span onmouseover="_tipon(this)" onmouseout="_tipoff()"><span class="google-src-text" style="direction: ltr; text-align: left">[[File:Flashing_with_Phoenix_06.jpg]] 8.</span> [[File: Flashing_with_Phoenix_06.jpg]] 8.</span> <span onmouseover="_tipon(this)" onmouseout="_tipoff()"><span class="google-src-text" style="direction: ltr; text-align: left">Press "..."</span> Нажмите кнопку "..."</span> <span onmouseover="_tipon(this)" onmouseout="_tipoff()"><span class="google-src-text" style="direction: ltr; text-align: left">button, and a window will appear where You have to choose a product code / language package combination.</span> кнопку, и появится окно, где Вы должны выбрать код продукта / языкового пакета комбинации.</span> <span onmouseover="_tipon(this)" onmouseout="_tipoff()"><span class="google-src-text" style="direction: ltr; text-align: left">Select the desired language package You want to upload on phone.</span> Выберите нужный язык пакета Вы хотите загрузить на телефон.</span> <span onmouseover="_tipon(this)" onmouseout="_tipoff()"><span class="google-src-text" style="direction: ltr; text-align: left">[[File:Flashing_with_Phoenix_09.jpg]] 9.</span> [[File: Flashing_with_Phoenix_09.jpg]] 9.</span> <span onmouseover="_tipon(this)" onmouseout="_tipoff()"><span class="google-src-text" style="direction: ltr; text-align: left">Click on "Update Software" button to start the flashing procedure.</span> Нажмите на кнопку "Обновление ПО", чтобы начать процедуру прошивки.</span> <span onmouseover="_tipon(this)" onmouseout="_tipoff()"><span class="google-src-text" style="direction: ltr; text-align: left">(You may click on Refurbish button, but in that case the user data and applications will be erased, and phone will be reseted to factory settings.) Do not remove the mobile phone from data cable.</span> (Вы можете нажать на кнопку отреставрировать, но в этом случае пользовательские данные и приложения будут удалены, а телефон будет reseted к заводским настройкам). Не снимайте мобильный телефон от кабеля для передачи данных.</span> <span onmouseover="_tipon(this)" onmouseout="_tipoff()"><span class="google-src-text" style="direction: ltr; text-align: left">[[File:Flashing_with_Phoenix_10.jpg]] 10.</span> [[File: Flashing_with_Phoenix_10.jpg]] 10.</span> <span onmouseover="_tipon(this)" onmouseout="_tipoff()"><span class="google-src-text" style="direction: ltr; text-align: left">The operation will take 2-3 minutes, when finished, a window will appear: "Firmware updating succeded.".</span> Операция займет 2-3 минуты, когда закончится, появится окно ". Обновления прошивки преуспели".</span> <span onmouseover="_tipon(this)" onmouseout="_tipoff()"><span class="google-src-text" style="direction: ltr; text-align: left">[[File:Flashing_with_Phoenix_07.jpg]]<br/> [[File:Flashing_with_Phoenix_08.jpg]] 11.</span> [[File: Flashing_with_Phoenix_07.jpg]] производителя <br/> [[File: Flashing_with_Phoenix_08.jpg]] 11.</span> <span onmouseover="_tipon(this)" onmouseout="_tipoff()"><span class="google-src-text" style="direction: ltr; text-align: left">Remove phone from cable, and turn it on.</span> Удалить телефон из кабеля, и включите его.</span> <span onmouseover="_tipon(this)" onmouseout="_tipoff()"><span class="google-src-text" style="direction: ltr; text-align: left">Check the firmware version of the phone by entering *#0000#</span> Проверьте версию прошивки телефона, введите * # 0000 #</span>
| + | == Language- and product code change procedure == |
| | + | 1. Turn on phone and connect it in OVI / PC Suite mode to computer with USB data cable. Install all the necessary USB cable drivers. |
| | + | |
| | + | |
| | + | 2. Run Phoenix Service Software as administrator. (Windows Vista, 7: right click -> run as administrator; XP: login with administrator privileges) |
| | + | |
| | + | [[File:Flashing_with_Phoenix_01.jpg]] |
| | + | |
| | + | |
| | + | 3. Select the USB port where the phone is connected. |
| | + | |
| | + | [[File:Flashing_with_Phoenix_02.jpg]] |
| | + | |
| | + | |
| | + | 4. Select "Scan product" in "File" menu to read phone information. |
| | + | |
| | + | [[File:Flashing_with_Phoenix_03.jpg]] |
| | + | |
| | + | |
| | + | 5. Mobile phone information sould be appear on the statusbar. That means the connection is working between mobile phone and computer. |
| | + | |
| | + | [[File:Flashing_with_Phoenix_04.jpg]] |
| | + | |
| | + | |
| | + | 6. Select "Firmware Update" from "Flashing" menu. |
| | + | |
| | + | [[File:Flashing_with_Phoenix_05.jpg]] |
| | + | |
| | + | |
| | + | 7. Phoenix Service Software will automatically select the suitable firmware (if available) for the connected mobile phone's product code. |
| | + | |
| | + | [[File:Flashing_with_Phoenix_06.jpg]] |
| | + | |
| | + | |
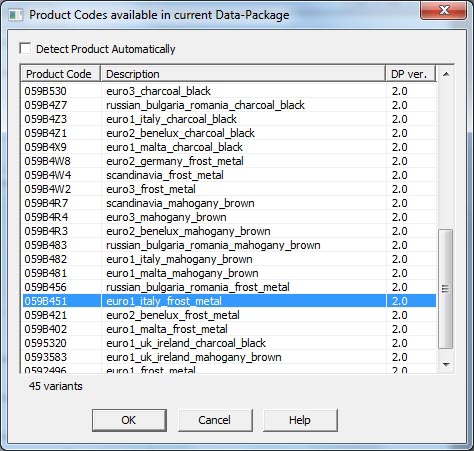
| | + | 8. Press "..." button, and a window will appear where You have to choose a product code / language package combination. Select the desired language package You want to upload on phone. |
| | + | |
| | + | [[File:Flashing_with_Phoenix_09.jpg]] |
| | + | |
| | + | |
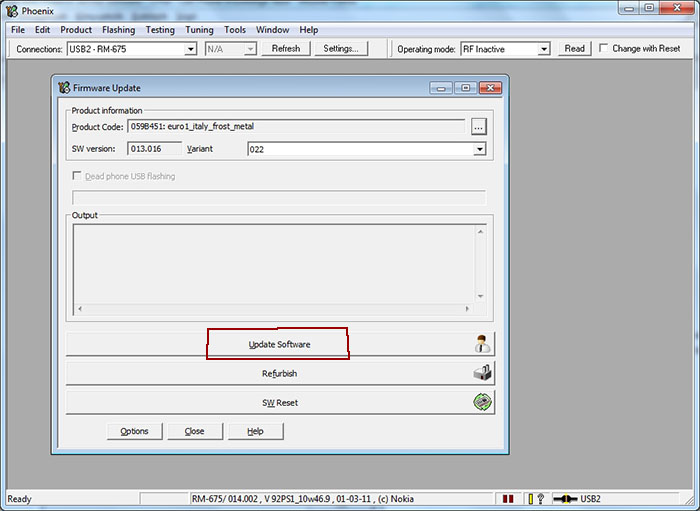
| | + | 9. Click on "Update Software" button to start the flashing procedure. (You may click on Refurbish button, but in that case the user data and applications will be erased, and phone will be reseted to factory settings.) Do not remove the mobile phone from data cable. |
| | + | |
| | + | [[File:Flashing_with_Phoenix_10.jpg]] |
| | + | |
| | + | |
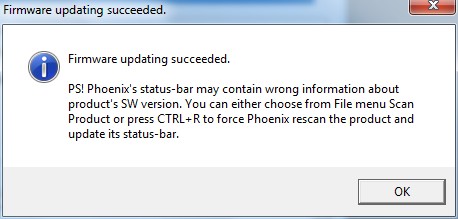
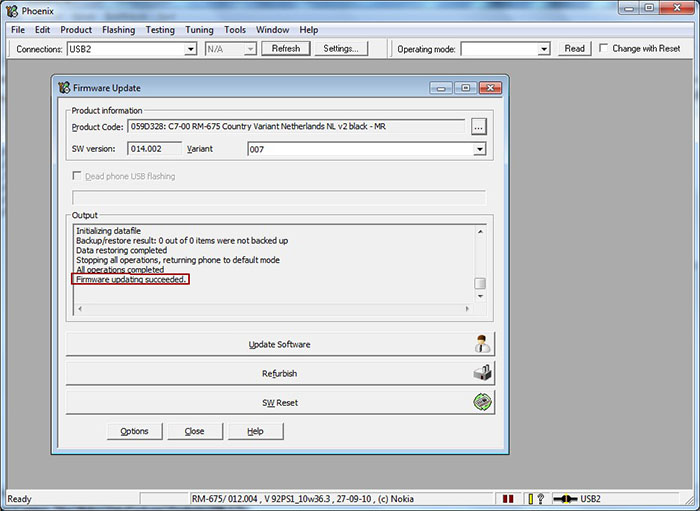
| | + | 10. The operation will take 2-3 minutes, when finished, a window will appear: "Firmware updating succeded.". |
| | + | |
| | + | [[File:Flashing_with_Phoenix_07.jpg]]<br/> |
| | + | [[File:Flashing_with_Phoenix_08.jpg]] |
| | + | |
| | + | |
| | + | 11. Remove phone from cable, and turn it on. Check the firmware version of the phone by entering *#0000# |
| | | | |
| | == Possible error messages == | | == Possible error messages == |
| Line 27: |
Line 77: |
| | | | |
| | ; Getting list of files to be flashed failed : Visit [[Nokia Phoenix Service Software - Getting list of files to be flashed failed error]] wiki page for more information and solution. | | ; Getting list of files to be flashed failed : Visit [[Nokia Phoenix Service Software - Getting list of files to be flashed failed error]] wiki page for more information and solution. |
| | + | |
| | + | ; Neither DP1.0 nor DP2.0 was found for the Product or the Product cannot be identified : Check your Nokia RM- code on your phone by pressing *#0000#. Then go to "C:\Programs Files\Nokia\Phoenix\Products" and create a folder naming like the phone's RM code (for example RM-313 or RM-596). Now Phoenix should identify firmware files correctly. |
| | | | |
| | == See also == | | == See also == |
Latest revision as of 11:04, 3 May 2013
Nokia mobile phone language or product code change using Phoenix Service software.
Also known as[edit]
- Nokia language change with Phoenix Service Software
- Nokia flashing guide using Phoenix Service Software
- Nokia product code change howto Phoenix Service Software
- always backup user data from phone
- phone battery should be charged
- it is recommended to close all applications (on computer and on phone)
- You may loose phone warranty by flashing the phone
- Even the pictures show the flashing of a Nokia C7, this procedure applies all the BB5 Nokia phones
What is needed?[edit]
Language- and product code change procedure[edit]
1. Turn on phone and connect it in OVI / PC Suite mode to computer with USB data cable. Install all the necessary USB cable drivers.
2. Run Phoenix Service Software as administrator. (Windows Vista, 7: right click -> run as administrator; XP: login with administrator privileges)
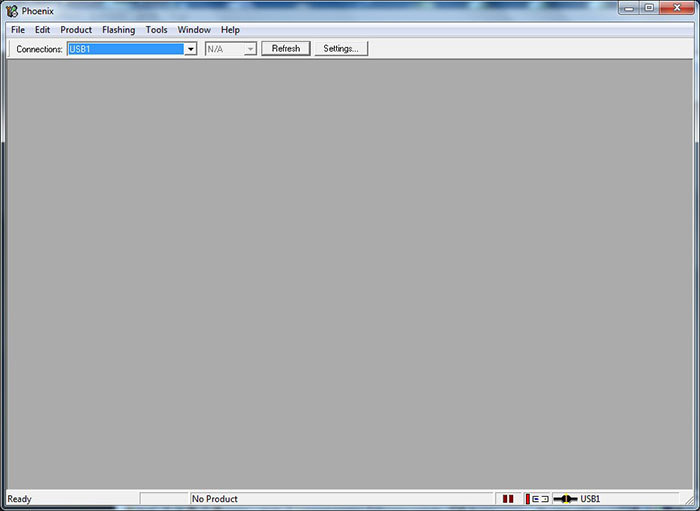
3. Select the USB port where the phone is connected.

4. Select "Scan product" in "File" menu to read phone information.
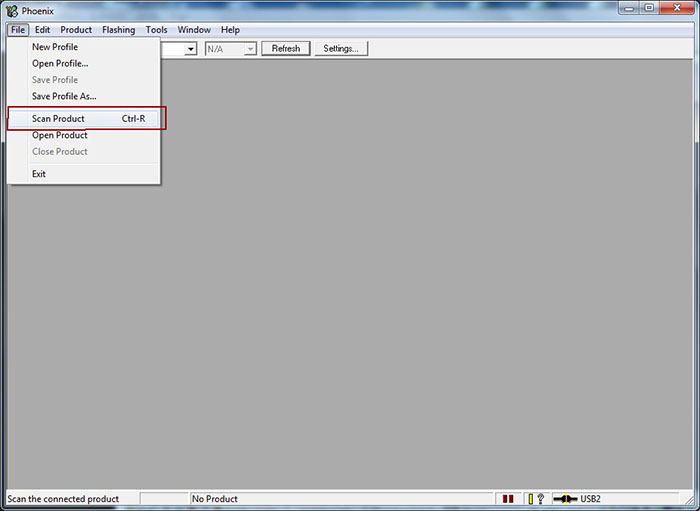
5. Mobile phone information sould be appear on the statusbar. That means the connection is working between mobile phone and computer.

6. Select "Firmware Update" from "Flashing" menu.
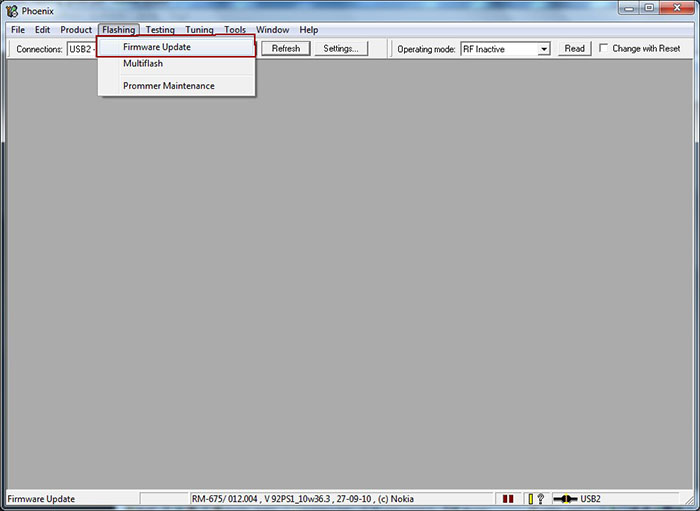
7. Phoenix Service Software will automatically select the suitable firmware (if available) for the connected mobile phone's product code.
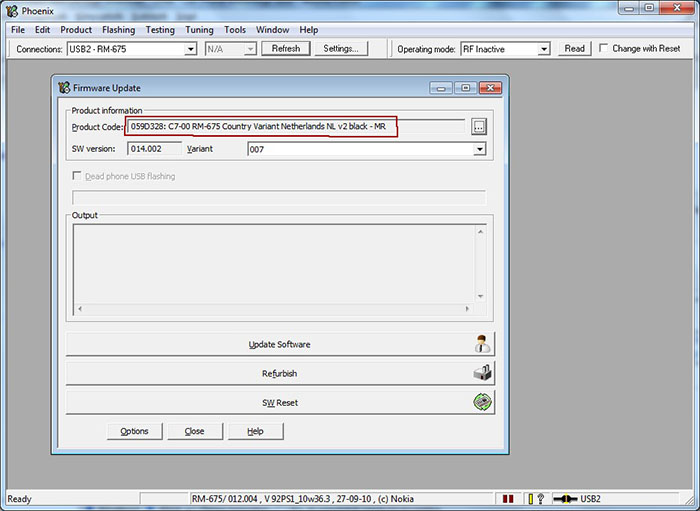
8. Press "..." button, and a window will appear where You have to choose a product code / language package combination. Select the desired language package You want to upload on phone.
9. Click on "Update Software" button to start the flashing procedure. (You may click on Refurbish button, but in that case the user data and applications will be erased, and phone will be reseted to factory settings.) Do not remove the mobile phone from data cable.
10. The operation will take 2-3 minutes, when finished, a window will appear: "Firmware updating succeded.".
11. Remove phone from cable, and turn it on. Check the firmware version of the phone by entering *#0000#
Possible error messages[edit]
Visit Nokia Phoenix Service Software - Possible error messages section for more.
- Getting list of files to be flashed failed
- Visit Nokia Phoenix Service Software - Getting list of files to be flashed failed error wiki page for more information and solution.
- Neither DP1.0 nor DP2.0 was found for the Product or the Product cannot be identified
- Check your Nokia RM- code on your phone by pressing *#0000#. Then go to "C:\Programs Files\Nokia\Phoenix\Products" and create a folder naming like the phone's RM code (for example RM-313 or RM-596). Now Phoenix should identify firmware files correctly.
See also[edit]


